Happy December and happy holiday baking season! As a baker, this is undoubtedly my favorite month of the year for making treats. Since I give cookies as Christmas gifts, I get to bake a TON of treats over the course of a few weeks. It’s SO much fun! Since Thanksgiving, I’ve already made 6 kinds of cookies, and as I’m writing this there’s another batch of dough chilling in the fridge. I’m basically in holiday cookie heaven.
While I like to try lots of new recipes each year, there are a couple of family favorites that just have to happen every December. One of them is Old-Fashioned Gingerbread Cookies.
I do have to get a little bossy here for a minute before I get back to my holiday baking. There is one rule with old-fashioned gingerbread: You have to try at least one cookie fresh out of the oven (with or without icing). There’s nothing quite like fresh baked gingerbread cookies eaten while the kitchen is still full of the scent of cinnamon, ginger, and cloves.
I don’t make the cookie rules, I just enforce them.
Ok, I’ve blathered on enough for today. Gather your ingredients and get to baking, friends!
Happy Holidays!
Old-Fashioned Gingerbread Cookies
Servings: 35 cookies*
Ingredients
- 2/3 c vegetable shortening
- 1 c sugar
- 1 beaten egg
- 1/4 c molasses
- 2 c flour
- 3/4 tsp salt
- 1 tsp baking soda
- 1 tsp ground cinnamon
- 1 tsp ground ginger
- 1 tsp ground cloves
- Optional Lemon Icing (see notes)
Instructions
- Preheat oven to 350°F
- In a medium bowl, combine flour, baking soda, salt, and spices. Set aside.
- In the bowl of a stand mixer fitted with a paddle attachment (or in a large bowl using a hand mixer), cream shortening and sugar until well combined.
- Add egg and molasses and beat until well combined.
- Add dry ingredients and mix until no bits of flour are remaining.
- On a floured surface, roll dough out to about 1/8-in thickness. Cut as desired, and move cookies to a cookie sheet. Gather dough scraps into a ball and roll out again. Repeat until all dough has been used. Note: this dough can be a bit delicate, so be patient and careful as you're cutting and moving them.
- Bake for about 10 minutes (less if your cookies are quite small, more if they are larger shapes). You don't want them to get too dark, but a little browning on the bottoms and edges is fine.
- Cool on cookie sheets for about 5 minutes, then move to a cooling rack and let cool completely.
- Frost as desired (see notes for the icing I used in the photos). Store in an airtight container at room temperature for up to a week, or freeze for up to 2 months.

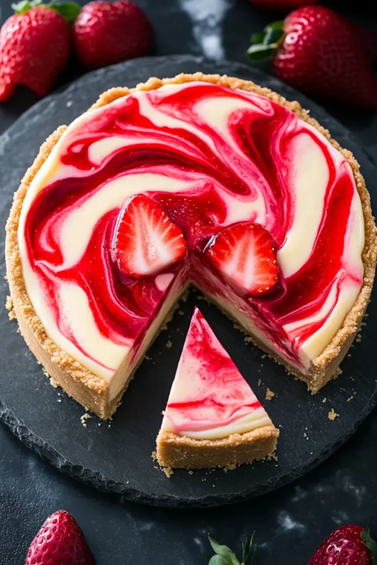
Strawberry Swirl Cheesecake
When it comes to classic desserts, cheesecake often reigns supreme. There is something undeniably luxurious about the creamy, rich texture of a well-made cheesecake. But if you want to take this traditional dessert to the next level, look no further than Strawberry Swirl Cheesecake. This recipe combines the decadence of a classic cheesecake with the fresh, fruity vibrancy of strawberry swirls, creating a dessert that is both visually stunning and irresistible in flavor. Whether you’re preparing for a special occasion or simply indulging in a personal craving, this cheesecake recipe will not disappoint.
Ingredients:
For the Crust:
- 1 ½ cups graham cracker crumbs
- ⅓ cup granulated sugar
- ½ cup unsalted butter, melted
For the Cheesecake Filling:
- 24 oz cream cheese, softened
- 1 cup granulated sugar
- 1 teaspoon vanilla extract
- 3 large eggs
- ⅓ cup sour cream
For the Strawberry Swirl:
- 1 cup fresh strawberries, hulled and sliced
- ⅓ cup granulated sugar
- 1 tablespoon lemon juice
Directions:
Prepare the Crust:
- Preheat your oven to 325°F (160°C).
- In a mixing bowl, combine graham cracker crumbs, sugar, and melted butter. Mix until well combined.
- Press the mixture firmly into the bottom of a 9-inch springform pan.
- Bake for 8-10 minutes until set. Remove from the oven and cool.
Make the Strawberry Swirl:
- In a small saucepan, combine sliced strawberries, sugar, and lemon juice.
- Cook over medium heat for about 5-7 minutes until the strawberries soften and release their juices.
- Mash the strawberries slightly with a fork or potato masher, then let cool.
Prepare the Cheesecake Filling:
- In a large bowl, beat the cream cheese until smooth.
- Add sugar and vanilla, mix until well combined.
- Add eggs one at a time, mixing at a low speed until just combined.
- Stir in sour cream until smooth.
Assemble the Cheesecake:
- Pour half of the cheesecake filling into the cooled crust.
- Drop spoonful of the strawberry mixture over the filling, then swirl with a knife.
- Add the remaining cheesecake filling and top with the remaining strawberry mixture, swirling again.
Bake the Cheesecake:
- Bake in the preheated oven for 55-65 minutes, or until the center is set but still slightly jiggly.
- Turn off the oven, crack the door, and let the cheesecake cool in the oven for 1 hour to prevent cracks.
Chill:
- Once cooled, refrigerate for at least 4 hours or overnight before serving.
Serve:
- Remove the cheesecake from the springform pan and slice.
- Garnish with fresh strawberries if desired.
How to Serve Strawberry Swirl Cheesecake
Serve chilled slices, and for extra flair, top each piece with fresh strawberries or a drizzle of strawberry sauce.
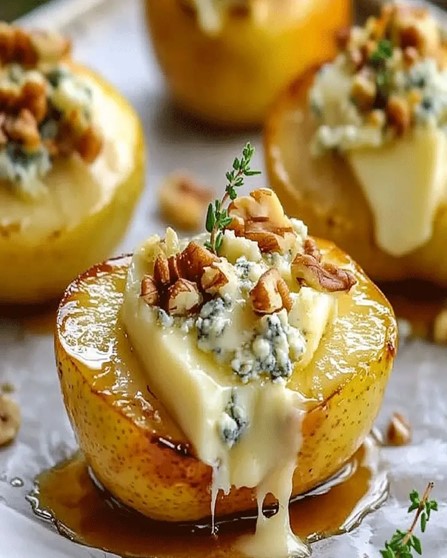
Roasted Pears with Blue Cheese, Walnuts and Honey
This Roasted Pears with Blue Cheese, Walnuts & Honey recipe brings a refined touch to your table. Roasted pears have a soft, caramelized sweetness, while crumbled blue cheese adds a tangy depth, walnuts bring a nutty crunch, and a drizzle of honey ties everything together. Traditionally enjoyed in European cuisines, this dish showcases the perfect balance between savory and sweet, making it an impressive addition to any menu, ideal for dinner parties or as a flavorful finish to your meal.
Ingredients for Roasted Pears with Blue Cheese, Walnuts & Honey
To make this “Roasted Pears with Blue Cheese, Walnuts & Honey” recipe, gather these fresh and high-quality ingredients:
· 4 ripe but firm pears (Bartlett, Anjou, or Bosc work well)
· 2 tablespoons unsalted butter, melted
· ¼ cup crumbled blue cheese (for a milder flavor, substitute with Gorgonzola)
· ¼ cup toasted walnuts, chopped
· 2 tablespoons honey (plus more for drizzling)
· 1 tablespoon fresh lemon juice
· ½ teaspoon cinnamon (optional)
· Fresh thyme (optional, for garnish)
How to Make Roasted Pears with Blue Cheese, Walnuts & Honey – Step by Step
1.
Preheat
the Oven
Start by preheating your oven to 375°F (190°C). Line a baking sheet with
parchment paper or foil to prevent sticking and for easy cleanup.
2.
Prepare
the Pears
Slice each pear in half lengthwise, carefully removing the core with a spoon or
melon baller to create a small cavity. Brush the pear halves with melted
butter, and if desired, sprinkle lightly with cinnamon for a warm touch of
spice.
3.
Roast
the Pears
Place the pears, cut side up, on the prepared baking sheet. Roast in the
preheated oven for 20–25 minutes or until tender and lightly golden.
4.
Add
the Toppings
Remove the pears from the oven and fill each cavity with crumbled blue cheese
and chopped walnuts. Drizzle with honey and add a squeeze of lemon juice for
brightness.
5.
Return
to the Oven
Pop the pears back into the oven for another 5 minutes, just until the blue
cheese begins to melt slightly.
6.
Serve
and Garnish
Transfer to serving plates, add an extra drizzle of honey, and garnish with
fresh thyme if desired.
Serving Suggestions for Roasted Pears with Blue Cheese, Walnuts & Honey
For complete experience, serve this dish with:
·
Wine
Pairings
Enjoy with a glass of Sauvignon Blanc or Chardonnay for a refreshing contrast.
·
Side
Dishes
Serve alongside a green salad with arugula or endive to balance the richness
with crisp, peppery notes.